
Catalog and pricing
The catalog is what you sell: products, their variants, and the brands and categories that organize them. Pricing covers the prices on each variant, price lists, tax rates and discount codes. Catalog managers and whoever sets prices work here, under Inventory (Products, Brands, Categories), Pricing → Price Lists and Sales → Discount Codes.
Before you start:
- You need a staff login to the back office (
/erp/). - A few things have no back-office screen yet: putting a product in a category, product image
galleries, variant options, price list items and tax rates. An administrator manages those
in the Django admin (
/admin/) or through the REST API. The admin is turned off in the public demo.
Create brands and categories
Section titled “Create brands and categories”Create these first, so you can pick them when you add products.
- Open Inventory → Brands and click New Brand. Enter the Title and tick Visible on website if the storefront should show it. Is featured store, Is authorized dealer, Sort order, Description, Website url, logo and banner image IDs and the SEO fields are optional. Click Save.
- Open Inventory → Categories and click New Category. Enter the Title, pick a Parent for a subcategory (leave it empty for a top-level one), tick Visible on website, and fill in descriptions, body copy and SEO fields as needed. Click Save.
The URL slug is created from the title. The lists show Visible and Featured columns so you can check at a glance what the storefront can show. SEO fields are described in Storefront SEO.
Add a product and its variants
Section titled “Add a product and its variants”A product is the thing you describe (title, brand, description, specifications); its variants are what you actually sell, each with its own SKU, prices and stock. Every product has at least one variant.
- Open Inventory → Products and click New Product.
- Under Product Info, enter the Title, Part number and Brand, and pick the Product type: Physical, Digital, Service, Kit or Bill of Materials.
- Tick Is active and Visible on website when the product is ready to sell online. Tick Has variants for a product sold in several versions (sizes, colors, packs).
- Fill in Description and Short description. The other sections (Identifiers, Specifications, Item and Shipping Dimensions, Shipping Methods & Hazmat, Units of Measure, MOQ & Lead Time, SEO, Google Merchant Center) are optional. Shipping dimensions and flags are used when the order editor calculates shipping rates.
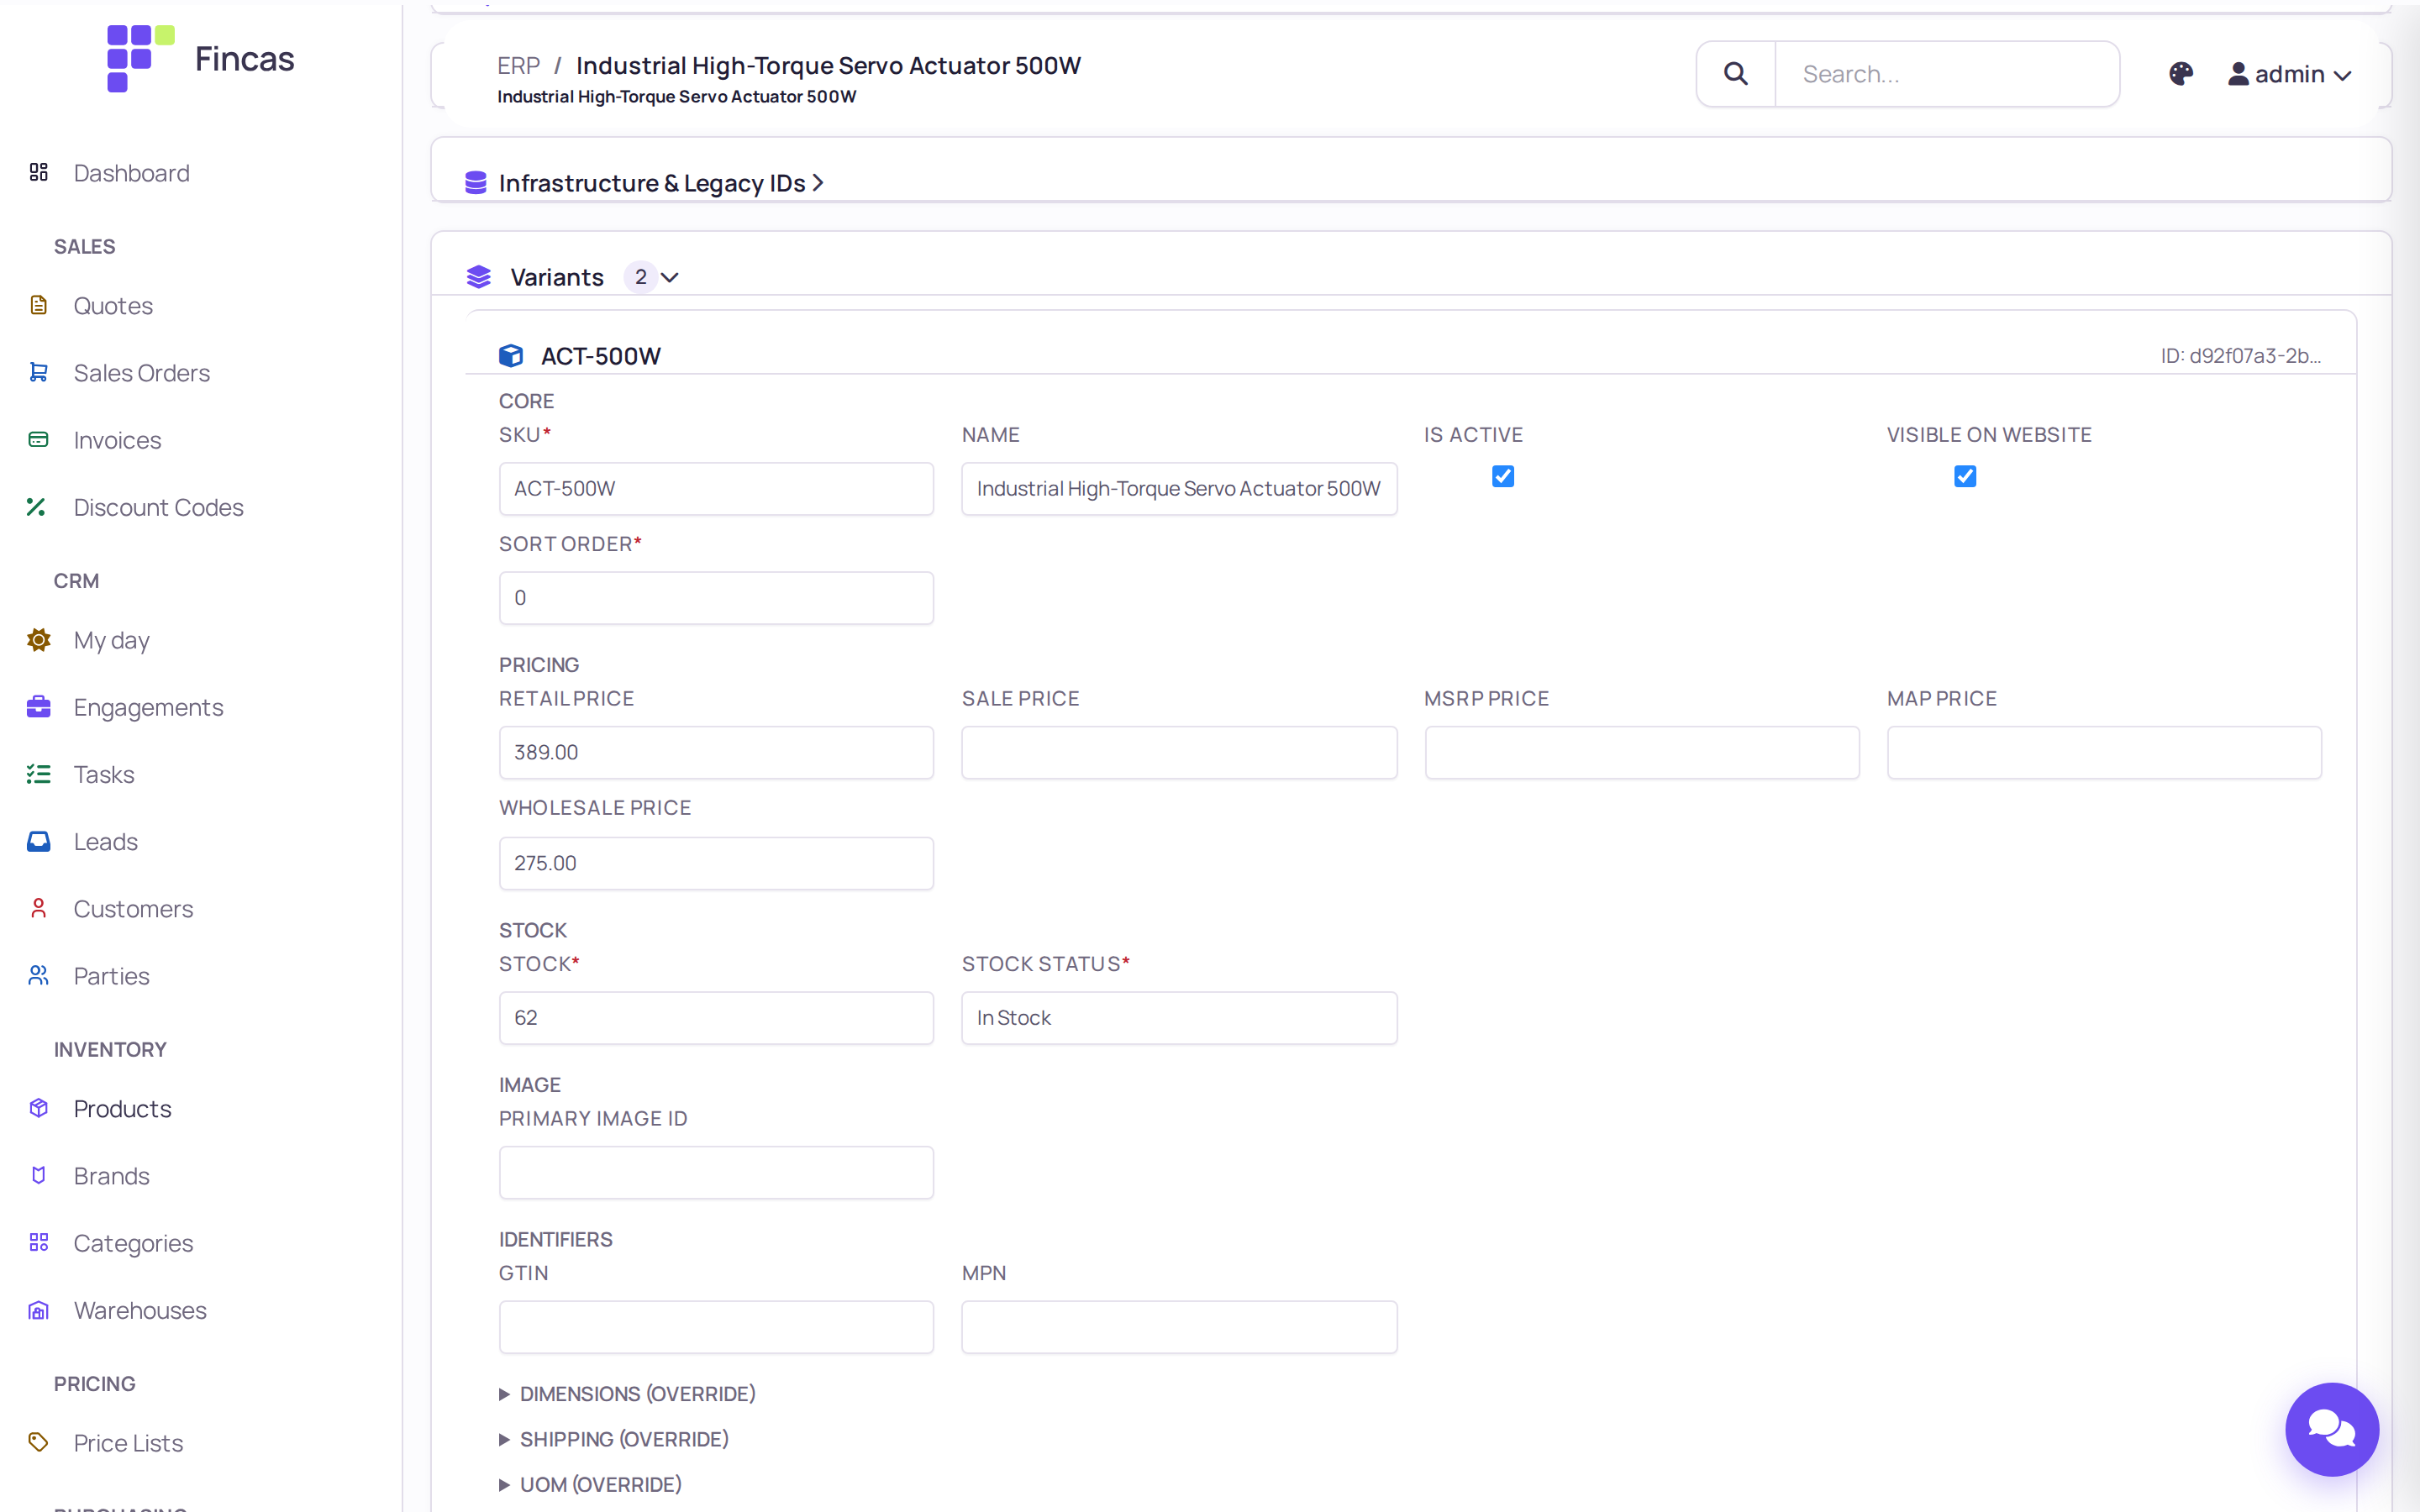
- In the Variant card, enter the SKU, a Name, and tick Is active and Visible on website. Under Pricing, enter at least the Retail price; Sale price, MSRP price, MAP price and Wholesale price are optional. Set Stock and Stock status (In Stock, Out of Stock, Preorder, Backorder).
- Click Add Variant for each further version, and fill it in the same way.
- Click Save.
To change an existing product, open it from the list. The page opens Locked; click Unlock to Edit, make your changes and click Save. Variant fields under Dimensions, Shipping, UOM, GMC and SEO are overrides: leave them empty to use the product’s values.
The product page also lists Supplier Costs, which purchasing uses (see Inventory and purchasing).
Images
Section titled “Images”Images live on an image CDN and are referenced by ID; the back office has no upload. Enter the
image’s ID in Primary image ID (and optionally Thumbnail image ID) on the product, or in
a variant’s Primary image ID. The storefront shows the image only when your deployment has
its image CDN configured (the BUNNY_IMAGES_BASE setting). Additional gallery images are added
in the Django admin or the API.
Categories and options
Section titled “Categories and options”The product page doesn’t set categories or variant options. To put a product in a category, or
to give variants option values such as size and color, use the Django admin (the Product
page has category and option sections) or the API (/api/v1/products/products/,
product-options/, product-option-values/, variant-option-values/).
Control what the storefront shows
Section titled “Control what the storefront shows”The storefront reads the catalog live from the API. Anyone not signed in as staff sees only:
- products that are Is active and Visible on website;
- within them, variants that are Is active and Visible on website (the “sellable” variants).
What a shopper sees for a product:
- Price: each variant’s Sale price when one is set, otherwise its Retail price. A product’s listed price is its lowest sellable variant price. With no price at all, the storefront shows “Price on request”.
- Stock: the total of its sellable variants’ stock, and the best of their stock statuses.
- Category and brand links: only to categories and brands marked Visible on website. A hidden category, or a category under a hidden parent, lists nothing.
To hide a product without deleting it, untick Visible on website (or Is active). See Storefront for the shop side.
Set up price lists
Section titled “Set up price lists”A price list holds prices for specific variants, each with a minimum quantity, so you can keep a wholesale or contract price book next to the retail prices on the variants.
- Open Pricing → Price Lists and click New Price List.
- Enter the Name, pick Price list type (Selling for customer prices, Buying for supplier prices) and the Currency.
- Tick Is active, and Is default for your main list. Optionally set Valid from / Valid to, Description and Notes.
- Click Save.
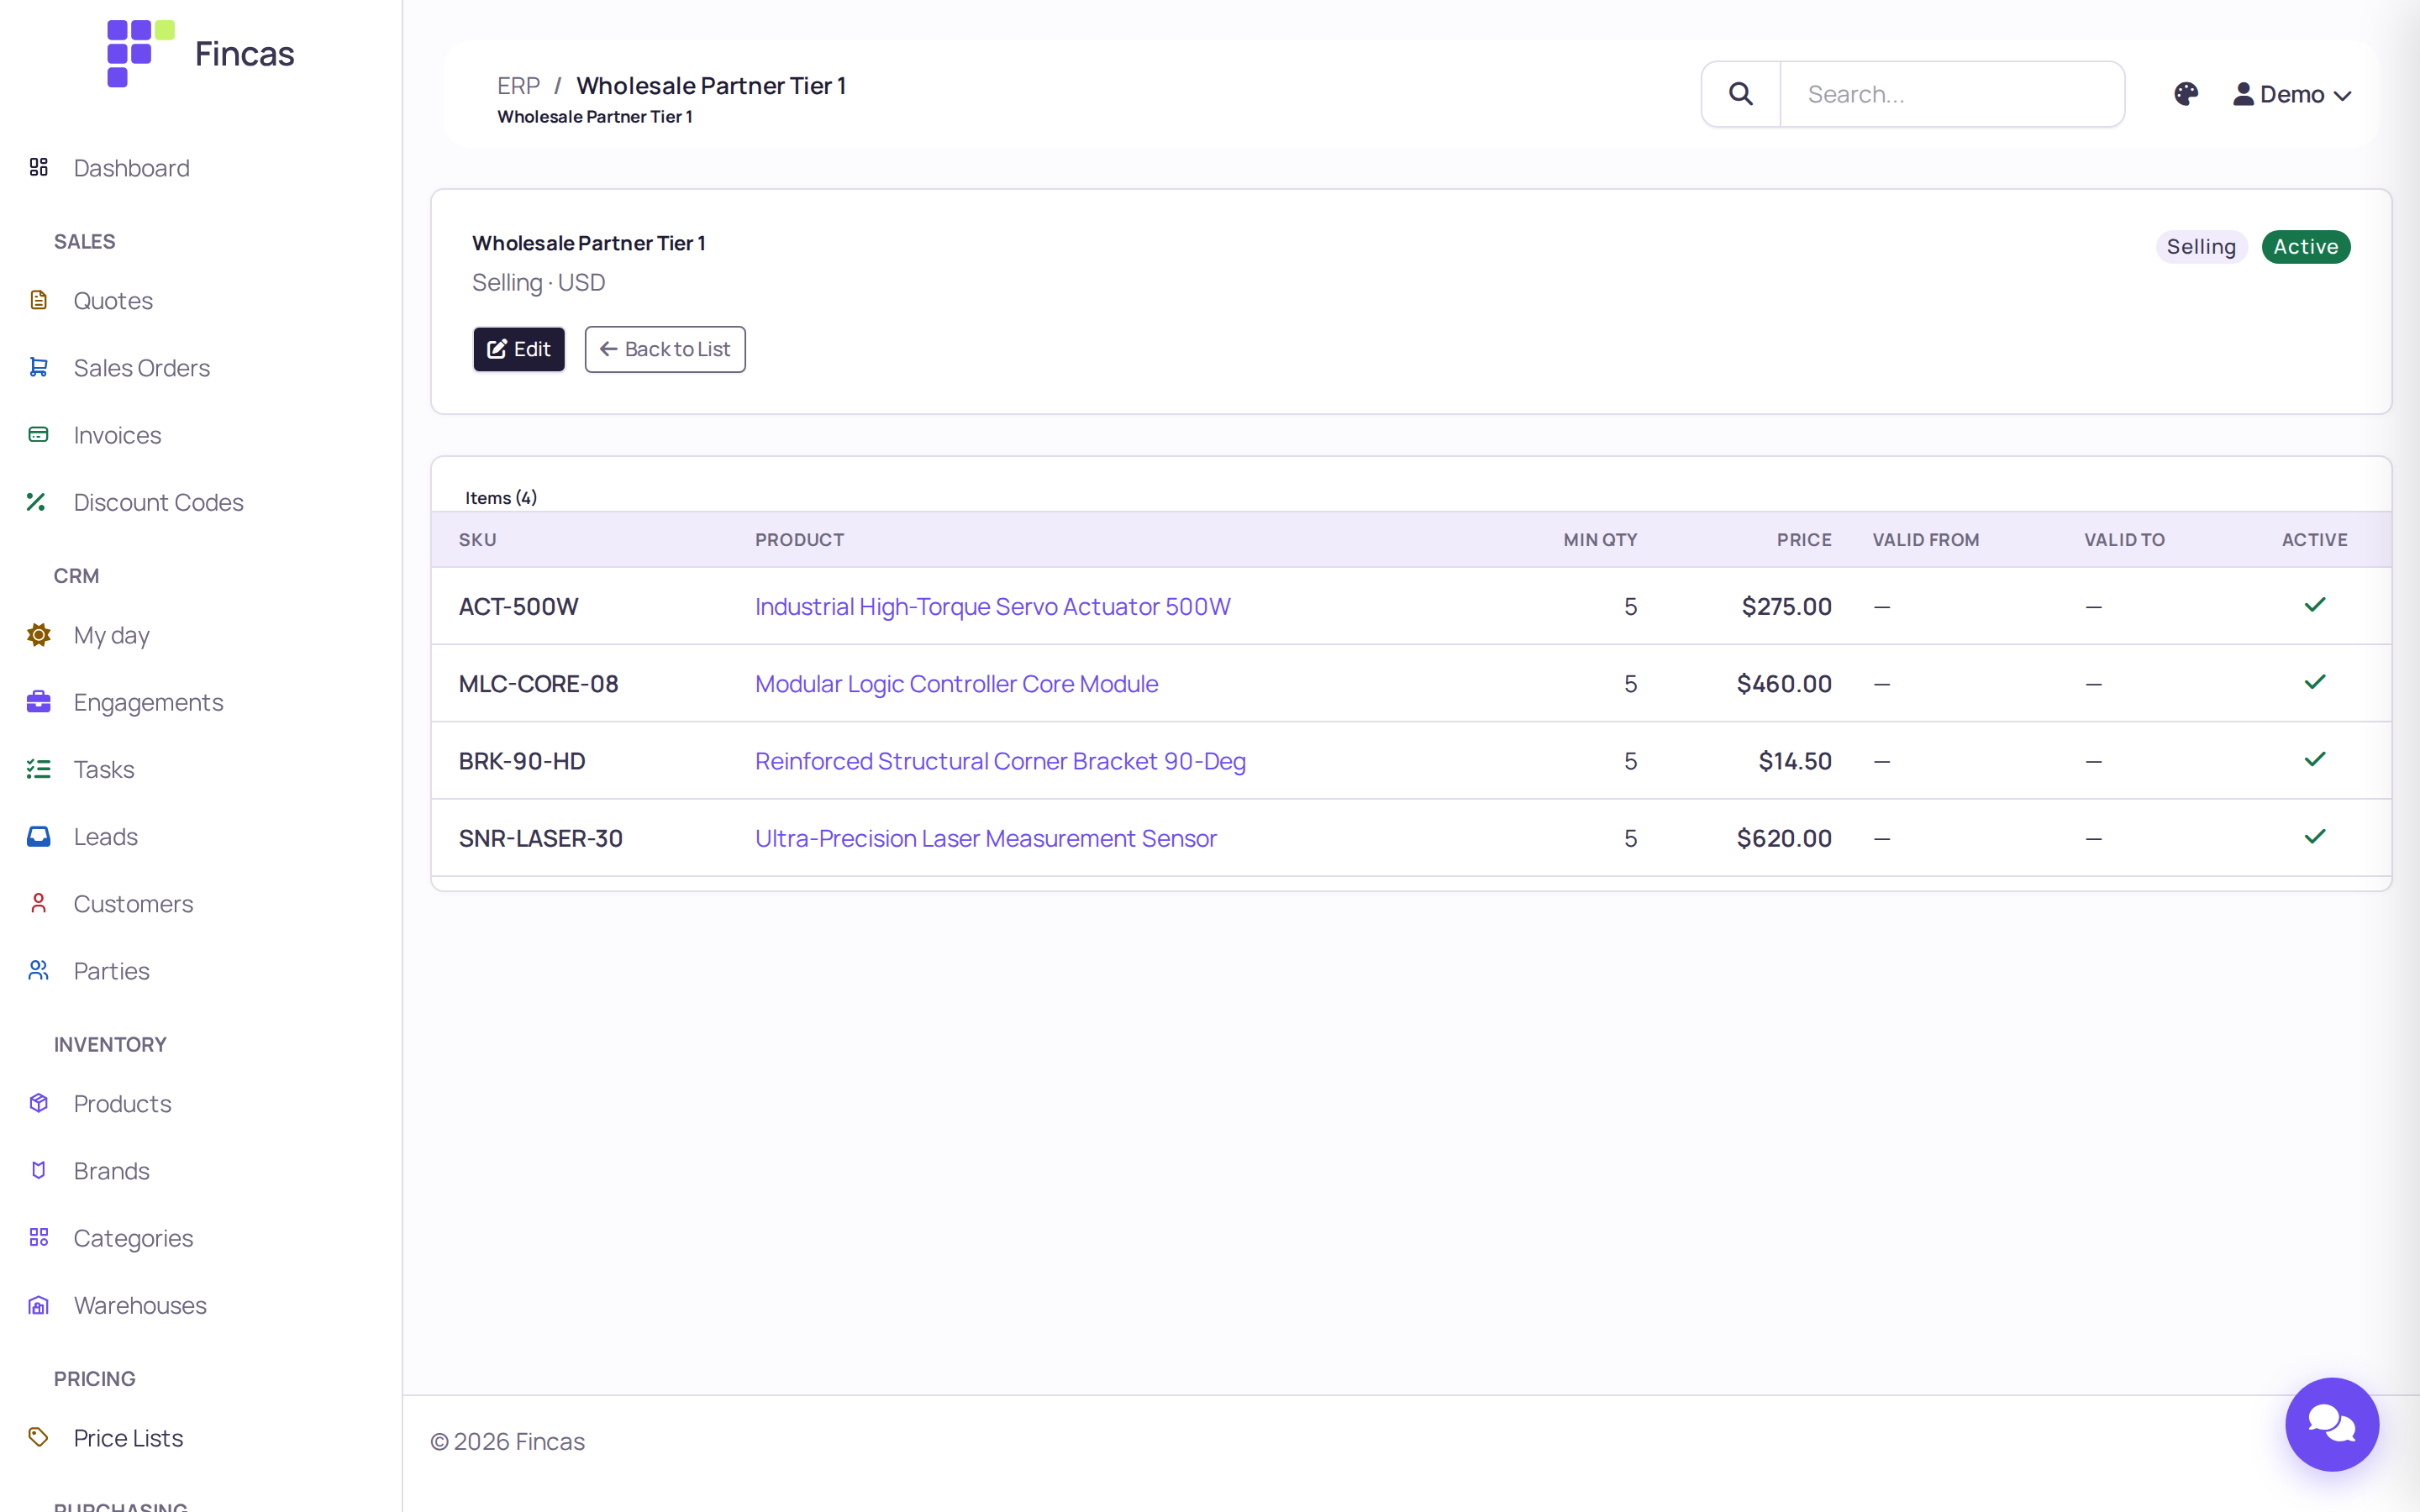
Open a price list to see its Items: SKU, Product, Min qty, Price, Valid
from, Valid to and Active. A row with Min qty 5 is the price from five units up;
add several rows for the same SKU to make quantity breaks. Items are added and changed in the
Django admin or through the API (/api/v1/pricing/price-list-items/); the back office shows
them read-only.
Assign customer tiers and default price lists
Section titled “Assign customer tiers and default price lists”Open the customer under CRM → Customers and click Edit.
- Classification → Pricing tier: Retail or Wholesale. The customer list can be filtered by it.
- Sales Defaults → Default price list: the price list the customer buys from.
Both record the customer’s terms for your staff; neither changes prices on quotes, orders or the storefront by itself.
Set up tax rates
Section titled “Set up tax rates”Tax rates are created in the Django admin (Pricing → Tax rates) or through the API
(/api/v1/pricing/tax-rates/). Each has a Name, a Rate stored as a fraction (0.0825
for 8.25%), a Jurisdiction, a Tax type (Sales Tax, Use Tax or VAT), an active flag and
optional effective dates.
Active rates appear in the Tax rate list on quotes and orders, next to Tax exempt. The customer’s own exemption details are under Tax Exemption on the customer form. Picking a rate on a document records it but does not calculate the tax (see Quotes, orders, invoices and payments).
Create discount codes
Section titled “Create discount codes”- Open Sales → Discount Codes and click New Discount Code.
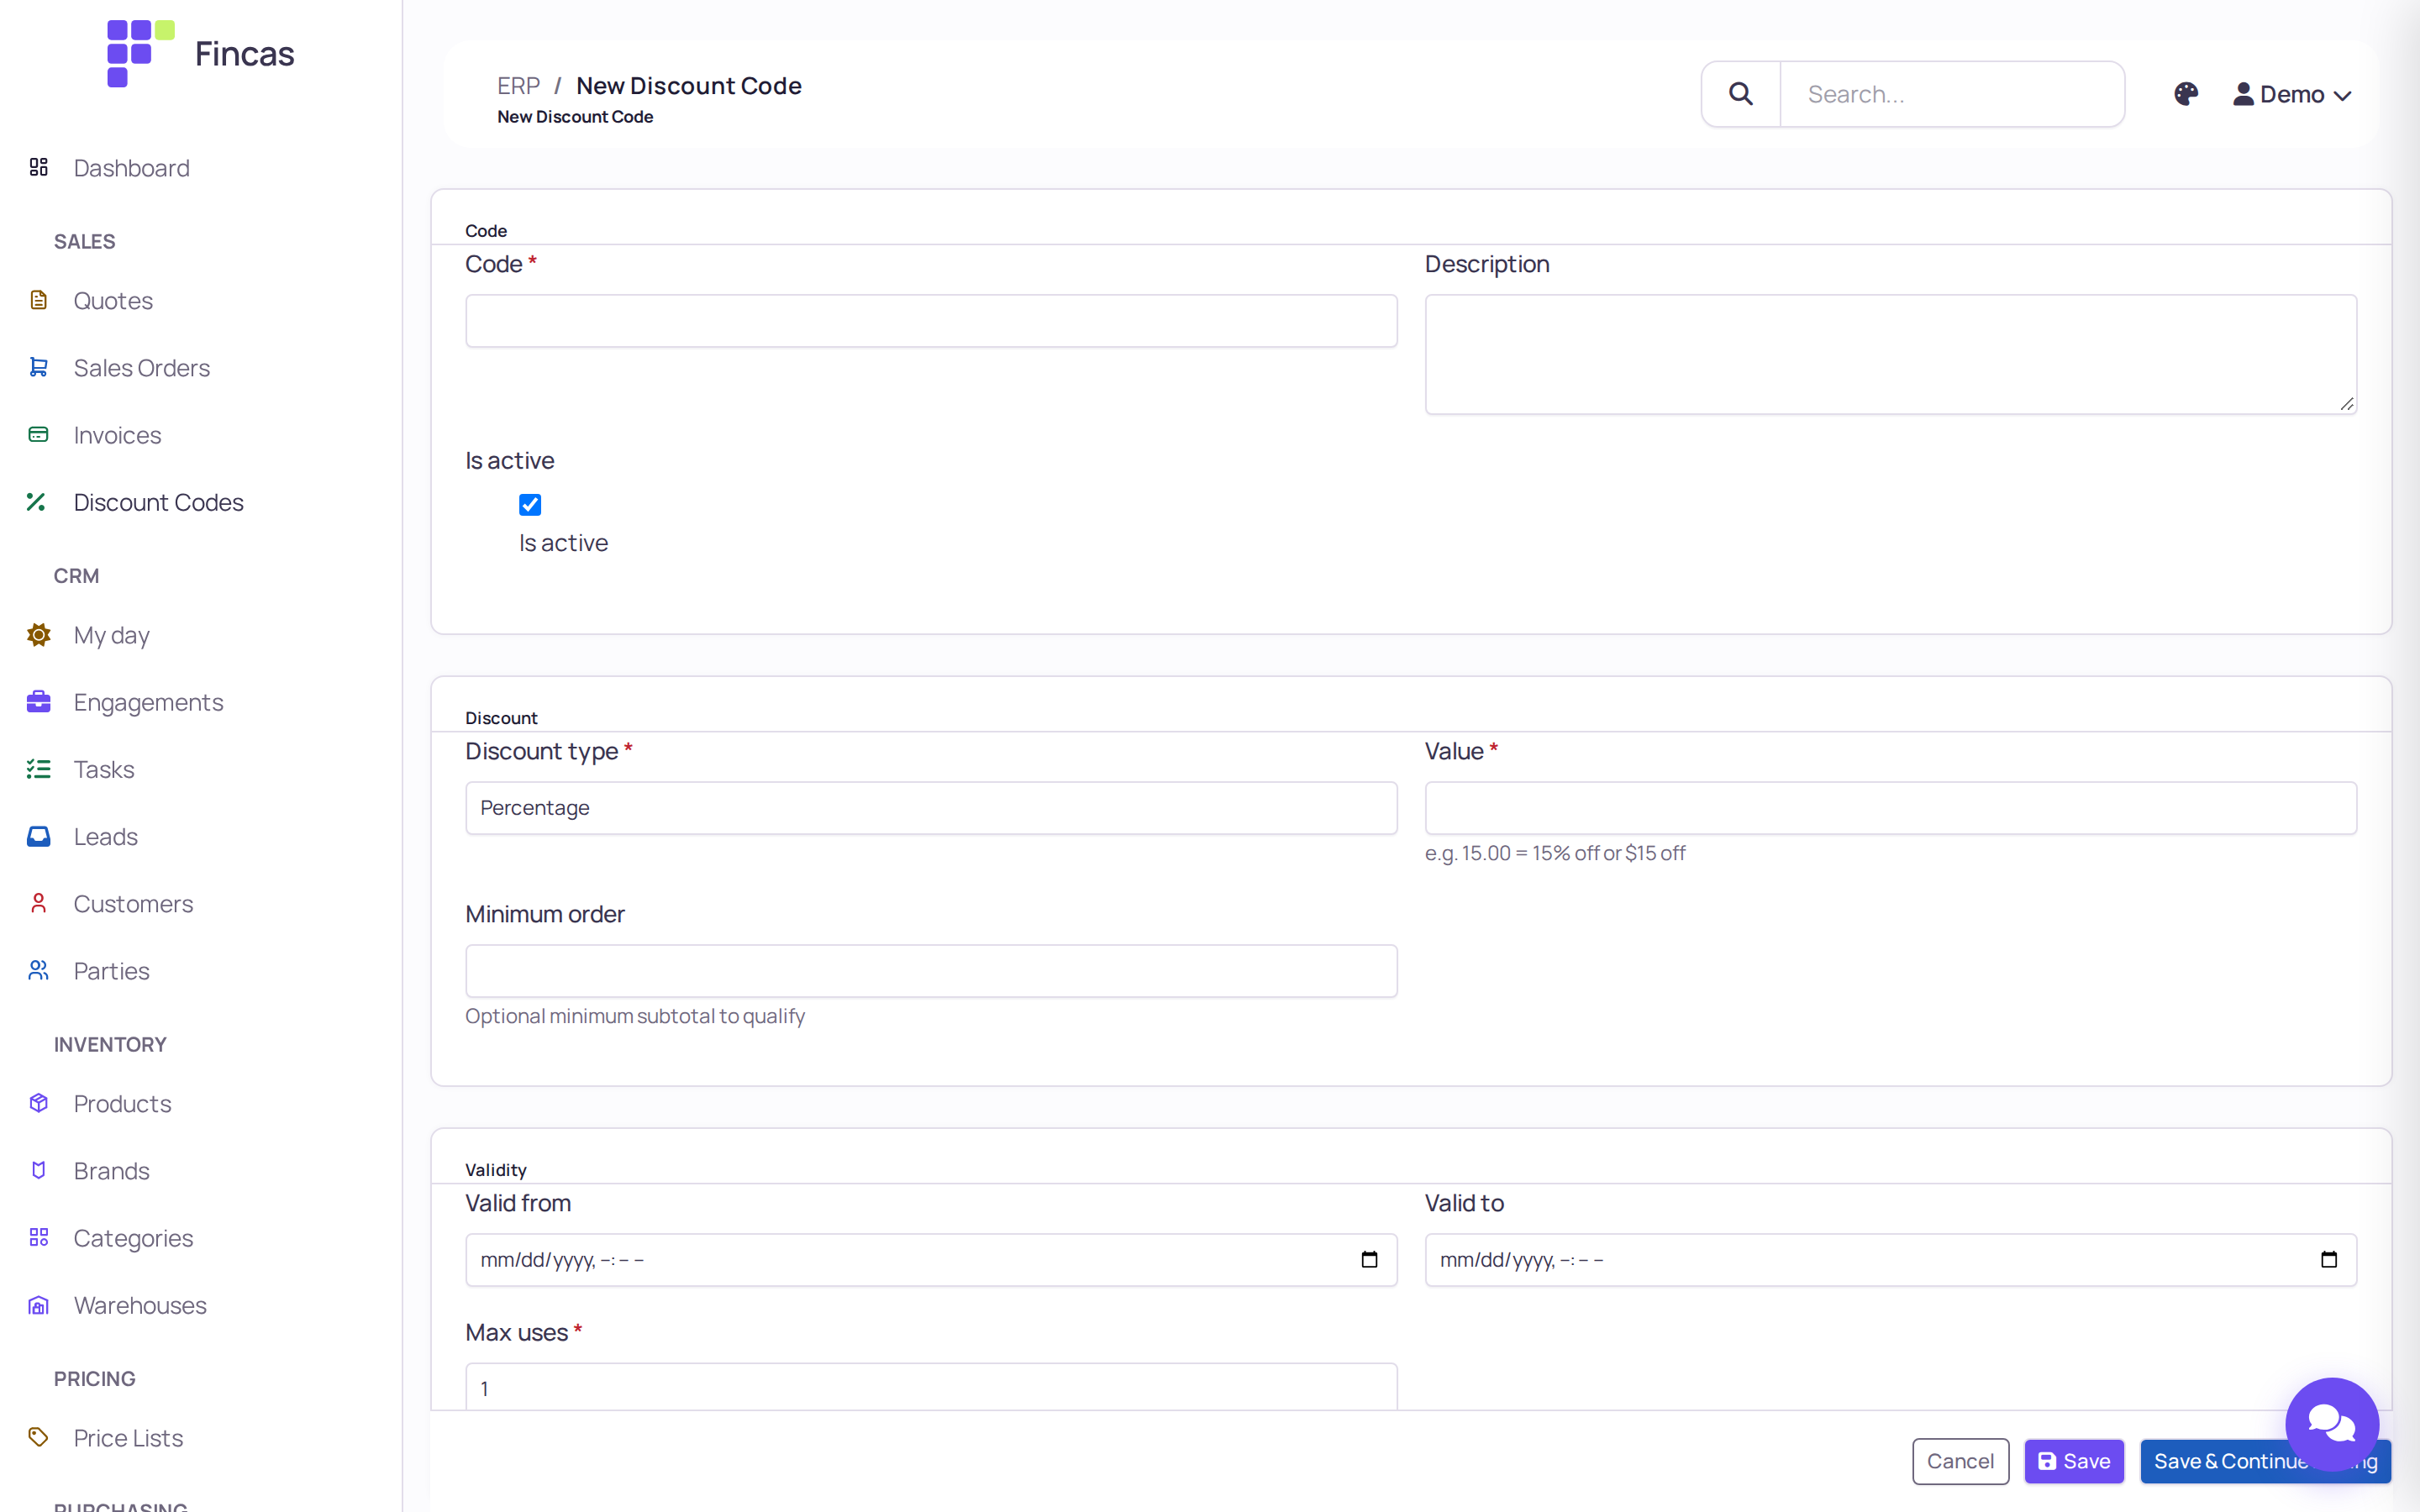
- Enter the Code and an optional Description. Leave Is active ticked.
- Pick the Discount type, Percentage or Fixed Amount ($), and the Value (15.00 means 15% off or $15 off). Set a Minimum order subtotal if the code needs one.
- Under Validity, set Valid from and Valid to, and Max uses (1 means one-time use).
- Under Scope, keep All Products, or pick Specific SKUs and list the SKUs in Allowed skus, one per line.
- Click Save.
To make many single-use codes at once, open /erp/discounts/generate/ (there is no menu link).
Enter a Prefix, a Count and a Code length, set the discount the same way, and click
Generate Codes. Codes come out as PREFIX-XXXXXXXX.
The list shows each code’s Uses against its Max. Open a code to see its recent uses, with the order number and customer email.
Discount codes are for the storefront checkout: the API checks a code (active, dates, uses left, minimum order, qualifying SKUs; case doesn’t matter) and counts a use after the order is placed. They don’t apply to quotes or orders entered in the back office; use Disc % or Discount amount there.
Check your work
Section titled “Check your work”- Inventory → Products lists the product with its SKU, brand, type and Active.
- Each variant you want to sell has a Retail price (or Sale price), and both it and its product are active and visible on the website.
- Inventory → Brands and Categories show Visible = Yes for everything the storefront should link to.
- The price list’s Items show the SKUs, minimum quantities and prices you expect.
- Sales → Discount Codes shows the code as Active, with the right Max and Expires.
If something goes wrong
Section titled “If something goes wrong”A product doesn’t appear on the storefront. The product or all of its variants are not both Is active and Visible on website, or (on a category page) the product isn’t in that category, or the category is hidden. Compare it with a product that shows.
The storefront shows “Price on request”. No sellable variant has a Retail or Sale price. Enter one on the variant.
The storefront price differs from the price list. Expected in the current release: the storefront uses the variant’s Sale price, or its Retail price. Change those to change the shop price.
A product has no image on the storefront. The image ID is empty, or the deployment has no image CDN configured. Ask whoever runs your deployment.
You can’t edit a product’s fields. The page is locked. Click Unlock to Edit.
The Tax rate list on a quote is empty. No active tax rates exist yet. Ask an administrator to add them.