

Quotes, orders, invoices and payments
This is the daily sales loop: a quote becomes a sales order, the order gets an invoice, and payments settle the invoice. Sales staff do most of it; whoever handles receivables records payments and refunds. Everything here is under Sales in the back-office sidebar: Quotes, Sales Orders and Invoices.
Before you start:
- You need a staff login to the back office (
/erp/). - The customer must exist under CRM → Customers, ideally with a billing and a shipping address. You can also add a customer, address or contact from inside the quote with the + and Add New buttons.
- The products you sell need a SKU and a Retail price on their variants (see Catalog and pricing).
- Recording a payment or a refund writes to the ledger, so your company needs posting rules for payments and refunds (see Accounting).
Create a quote
Section titled “Create a quote”- Open Sales → Quotes and click New Quote. (Starting a quote from an engagement puts it on that deal and fills in the deal’s customer when there is one.)
- In Customer, type at least two letters of the name and pick the customer from the list.
- Check Quote expiration date (it defaults to a week from today) and Validity period days.
- In Engagement, keep New engagement to open a new deal, or pick one of the customer’s open deals. You can’t change this after the first save.
- Pick the Billing address, Contact and Shipping address. Same as Billing copies the billing address as a new shipping address.
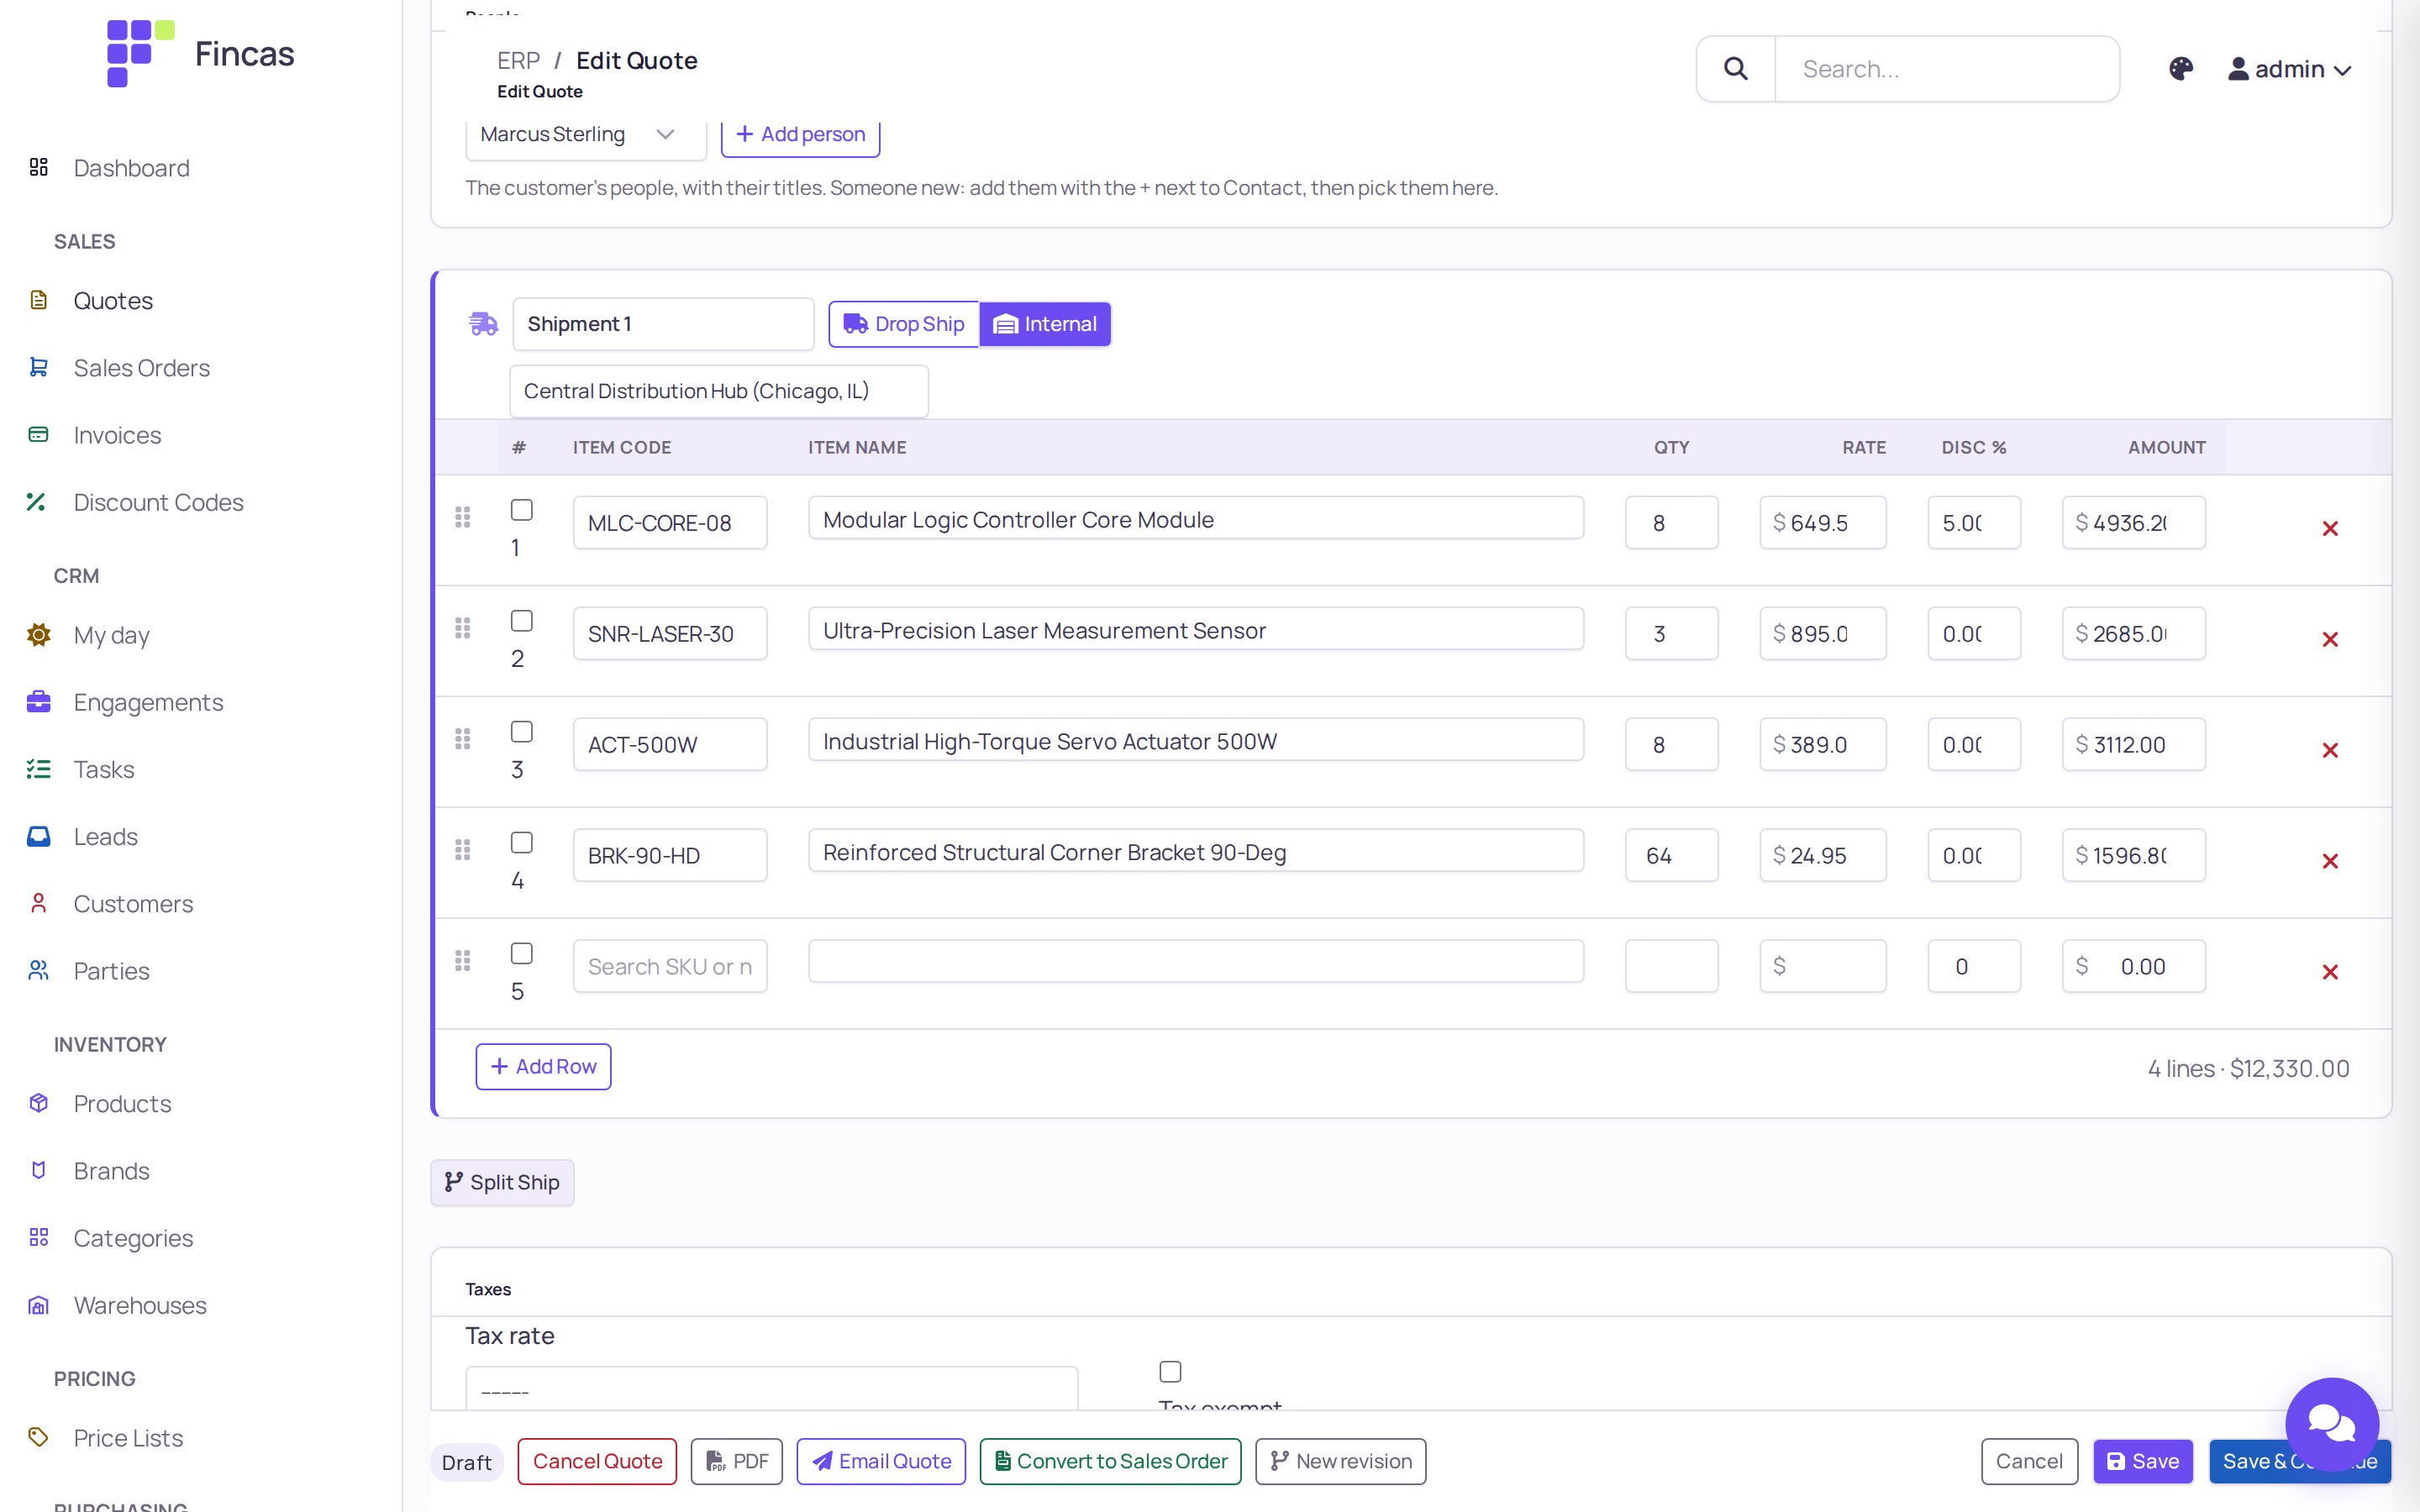
- Add lines. In Item code, type part of a SKU or product name and pick the variant from the list. The item name and Rate fill in from the variant’s retail price and Qty becomes 1. Change Qty, Rate or Disc % as needed; Amount updates as you type. Click Add Row for more lines.
- Optionally pick Payment terms proposed and Shipping terms proposed, and enter a whole-quote Discount amount or Shipping cost ex tax under Totals.
- Click Save & Continue. The quote gets its number (for example
QT-00077) and status Draft.
A quote must have at least one line before it saves. The More Info tab holds the status, currency, price list, sales rep, special conditions and internal notes.
Send the quote
Section titled “Send the quote”- PDF opens the quote as a PDF in a new tab. Check it before you send it.
- Email Quote emails the PDF to the quote’s contact, or to the customer’s email when no contact is set. You confirm the address first. A Draft quote becomes Sent.
Email is turned off in the public demo.
Revise a quote
Section titled “Revise a quote”When the customer asks for changes after you sent a quote, make a revision instead of editing the sent one.
- Open the quote and click New revision, then confirm.
- Fincas copies the quote, with its lines, as a new quote on the same deal and opens it. The message names both numbers, for example “Revision 2 of QT-00077 created as QT-00079; QT-00077 is superseded.”
- Edit the new quote and send it.
The old quote’s status becomes Superseded (unless it was already accepted) and its New revision button turns into View revision. Only the newest quote in the chain can be revised.
Convert the quote to a sales order
Section titled “Convert the quote to a sales order”- Open the quote the customer accepted and click Convert to Sales Order.
- Confirm. Fincas saves the quote first, so the order matches what is on screen.
- The new sales order opens with the message “Sales Order SO-… created from QT-…. It is Pending — no confirmation email has been sent.”
The order copies the customer, addresses, contact, people, terms, totals, shipment plan and lines from the quote. The quote’s status becomes Accepted and its deal is marked won. Converting twice is safe: the button becomes View Sales Order, and it opens the same order.
You can also start an order without a quote: Sales → Sales Orders → New Sales Order. The editor works the same way as the quote editor, with an Order type (Sales, Maintenance, Drop Ship, Internal Transfer) and a Customer PO number.
Plan shipments
Section titled “Plan shipments”Every quote and order has at least one shipment group, Shipment 1. Each group is either Drop Ship (a vendor ships it) or Internal (you ship it from your own warehouse).
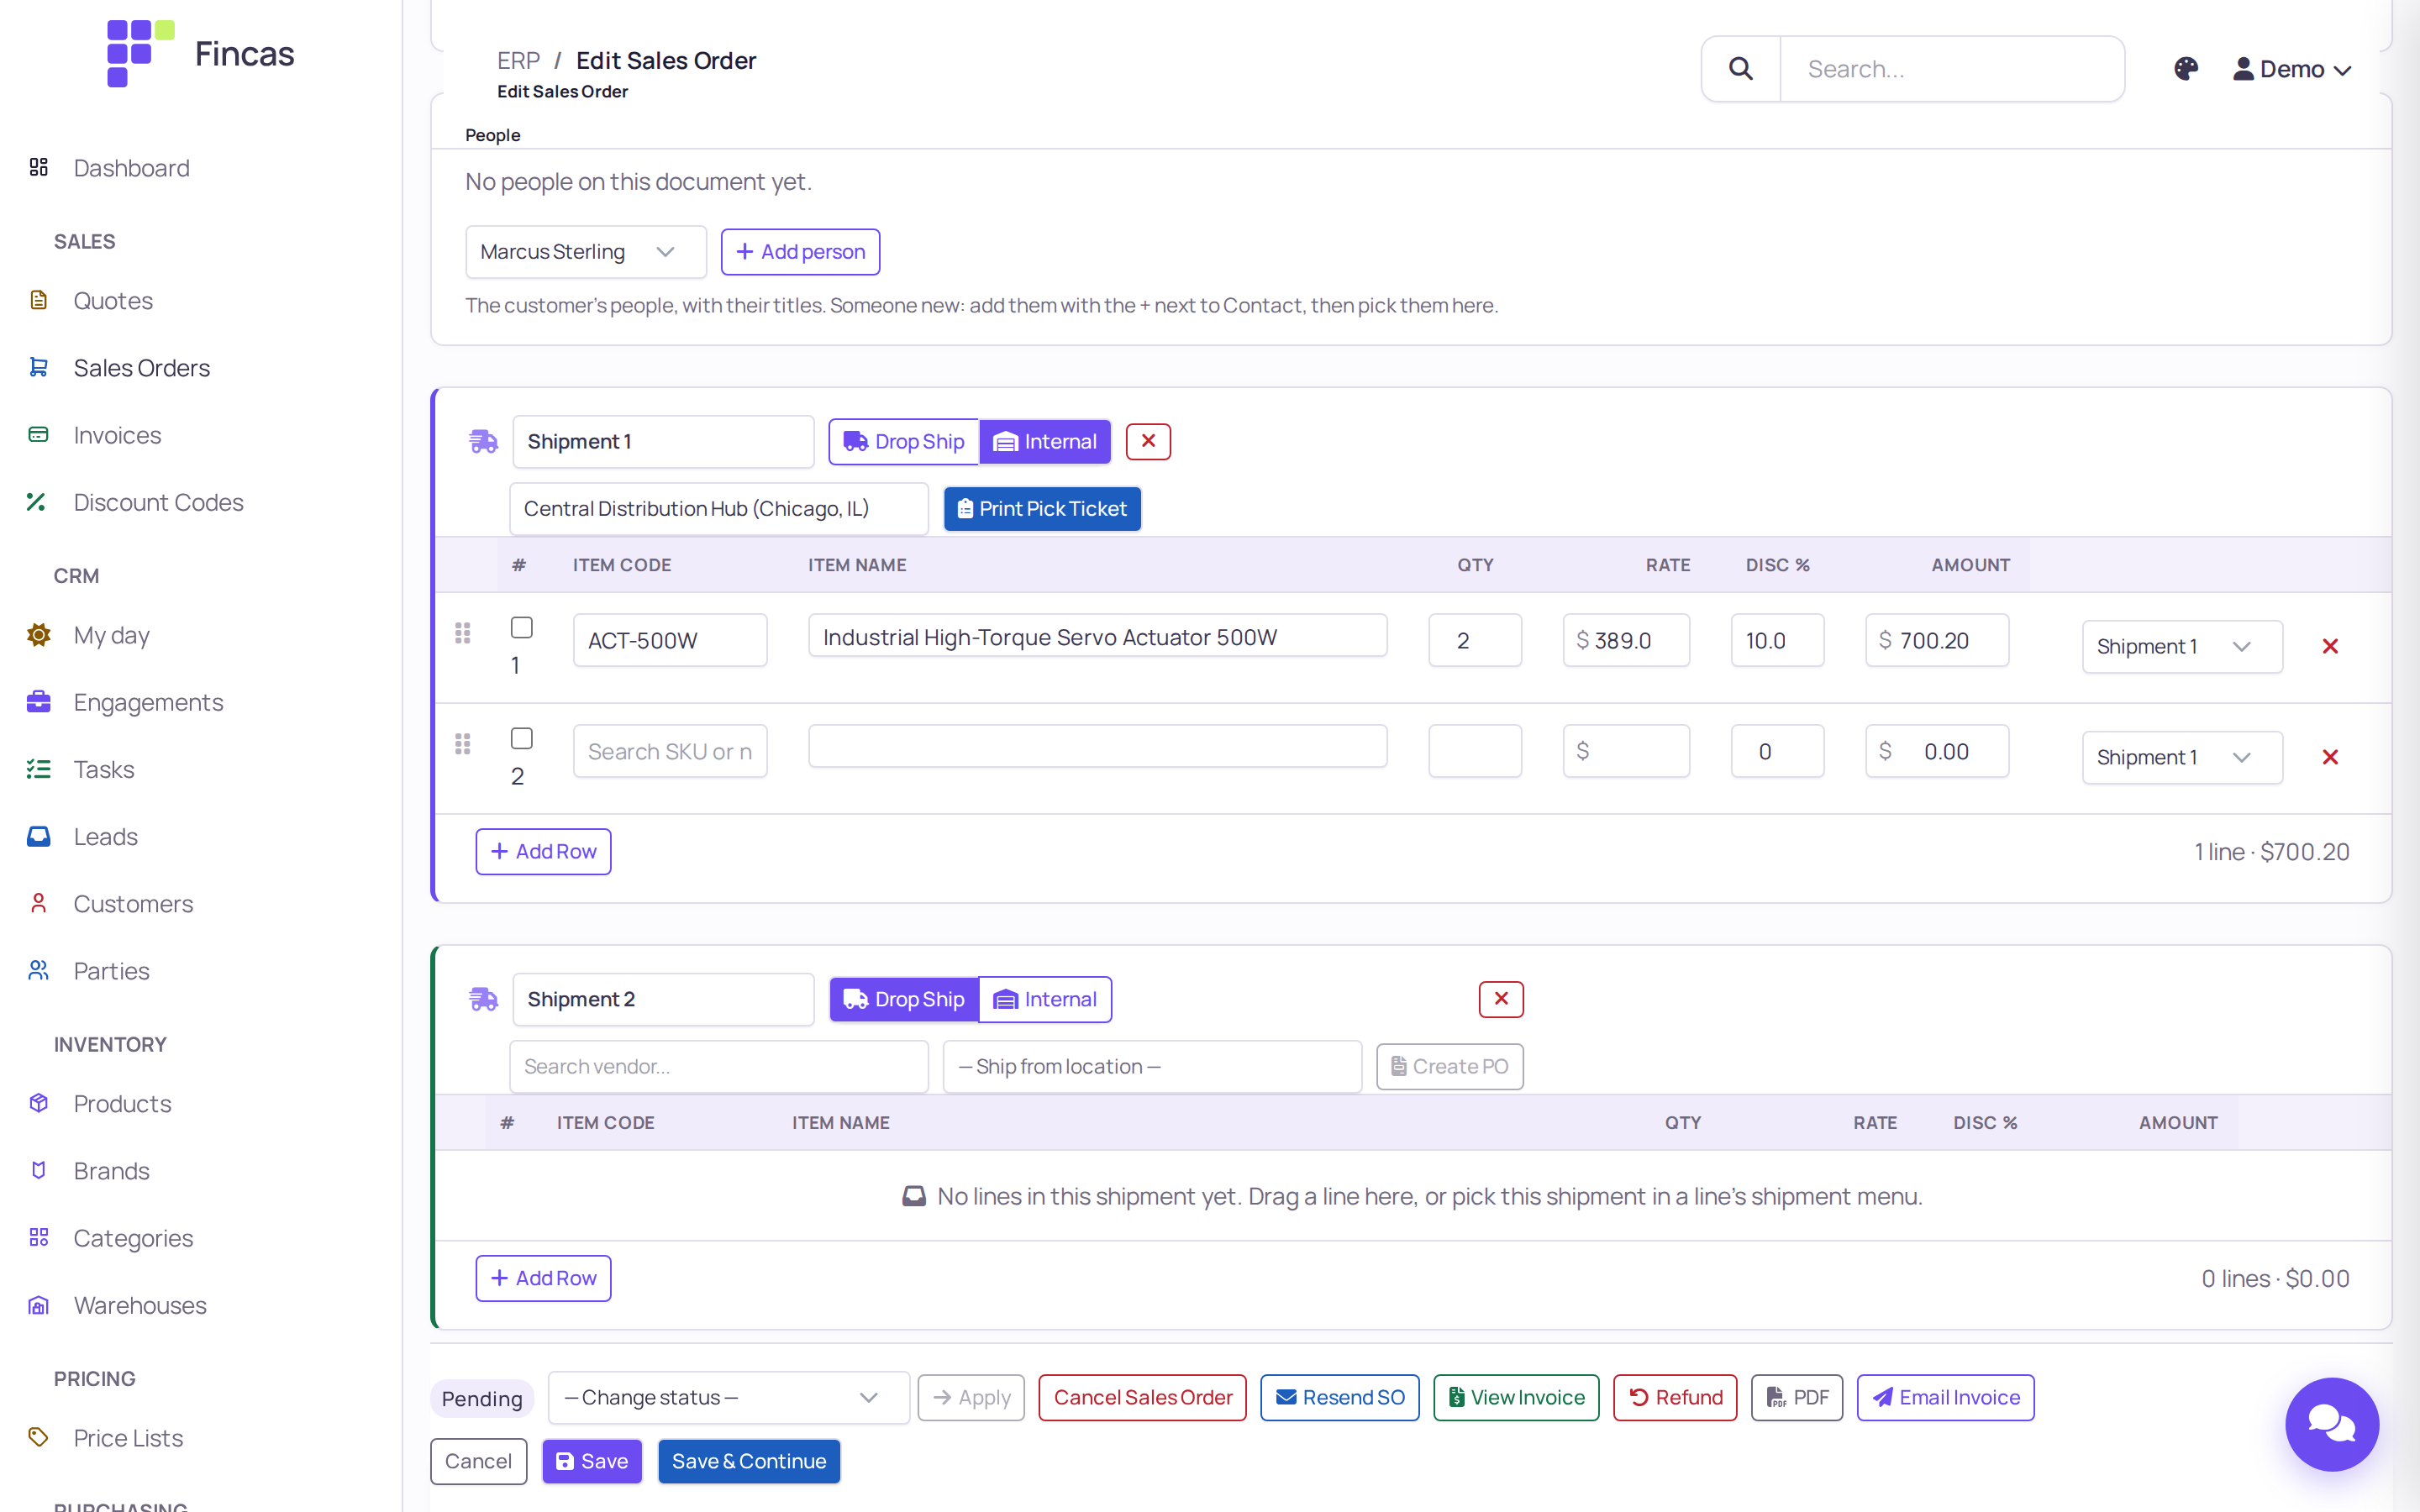
- On the group, click Internal and pick the warehouse in Ship from warehouse, or click Drop Ship, type in Search vendor…, pick the vendor and then its Ship from location.
- To ship part of the order separately, click Split Ship. A new group appears.
- Move a line to another group with the shipment menu at the end of its row, or drag it by the handle on the left. Dragging within a group changes the line order.
- Rename a group in its name box if that helps, and click Save & Continue.
On a saved sales order, each group also has a fulfillment button:
- Create PO (Drop Ship groups) opens a new purchase order for that vendor and shipment. Pick the vendor first. See Inventory and purchasing.
- Print Pick Ticket (Internal groups) creates a pick ticket for the group and opens it for printing. Allow pop-ups for the back office if nothing opens.
After that, the button shows the purchase order or pick ticket number and opens it. A line that has shipped, has fulfillment started, or is on a purchase order or pick ticket is locked to its group: its shipment menu and remove button go away.
Move the order through its statuses
Section titled “Move the order through its statuses”A new order starts as Pending. To change it, pick a status in Change status at the bottom of the order and click Apply, then confirm. The statuses are Incomplete, Pending, Awaiting Payment, Awaiting Fulfillment, Awaiting Shipment, Partially Shipped, Shipped, Completed, Canceled, Declined, Disputed, Manual Verification Required, Partially Refunded, On Hold and Backordered.
- Moving an order from Pending to Awaiting Fulfillment for the first time emails the order confirmation to the customer, if the customer has an email address.
- Resend SO sends the order confirmation again to an address you enter.
- Cancel Sales Order sets the status to Canceled.
- When a payment clears the balance of an order that is Awaiting Payment, the order moves to Awaiting Fulfillment by itself.
Invoice the order
Section titled “Invoice the order”- Open the sales order and click Create Invoice, then confirm.
- The invoice page opens with “Invoice INV-… created.”
- Check the totals, then click Email invoice to send the PDF to the customer’s email address, or PDF / Print preview to see it first.
The invoice starts as Draft and takes the order’s subtotal, tax, shipping and total at that moment. Its due date comes from the order’s Payment terms: Net 15, 30, 45 or 60 set a due date; other terms leave it blank. Emailing a Draft invoice makes it Sent and posts it to the ledger.
Each order has one invoice. After the first, the order shows View Invoice, Record Payment, PDF and Email Invoice instead of Create Invoice. Changes you make to the order afterward don’t change the invoice, so finish the order before you invoice it.
Record a payment
Section titled “Record a payment”- Open the invoice (from Sales → Invoices, or View Invoice / Record Payment on the order).
- In the Record payment box, Amount is filled with the balance due. Change it for a partial payment.
- Check Date, pick the Method (Credit Card, Debit Card, ACH, Wire Transfer, Check, PayPal, Marketplace, Store Credit, Cash or Other) and enter the check or transaction number in Reference.
- Click Record payment.
A partial payment shows “Payment PAY-… recorded; 500.20 still due on INV-…” and the invoice becomes Partially Paid. Record the next payment the same way. The payment that clears the balance shows “… is paid in full”, the invoice becomes Paid and the box reads “Paid in full on …”. The order’s payment status follows (Partial, then Paid).
You can’t record more than the balance due, and a double click records one payment, not two.
Refund a payment
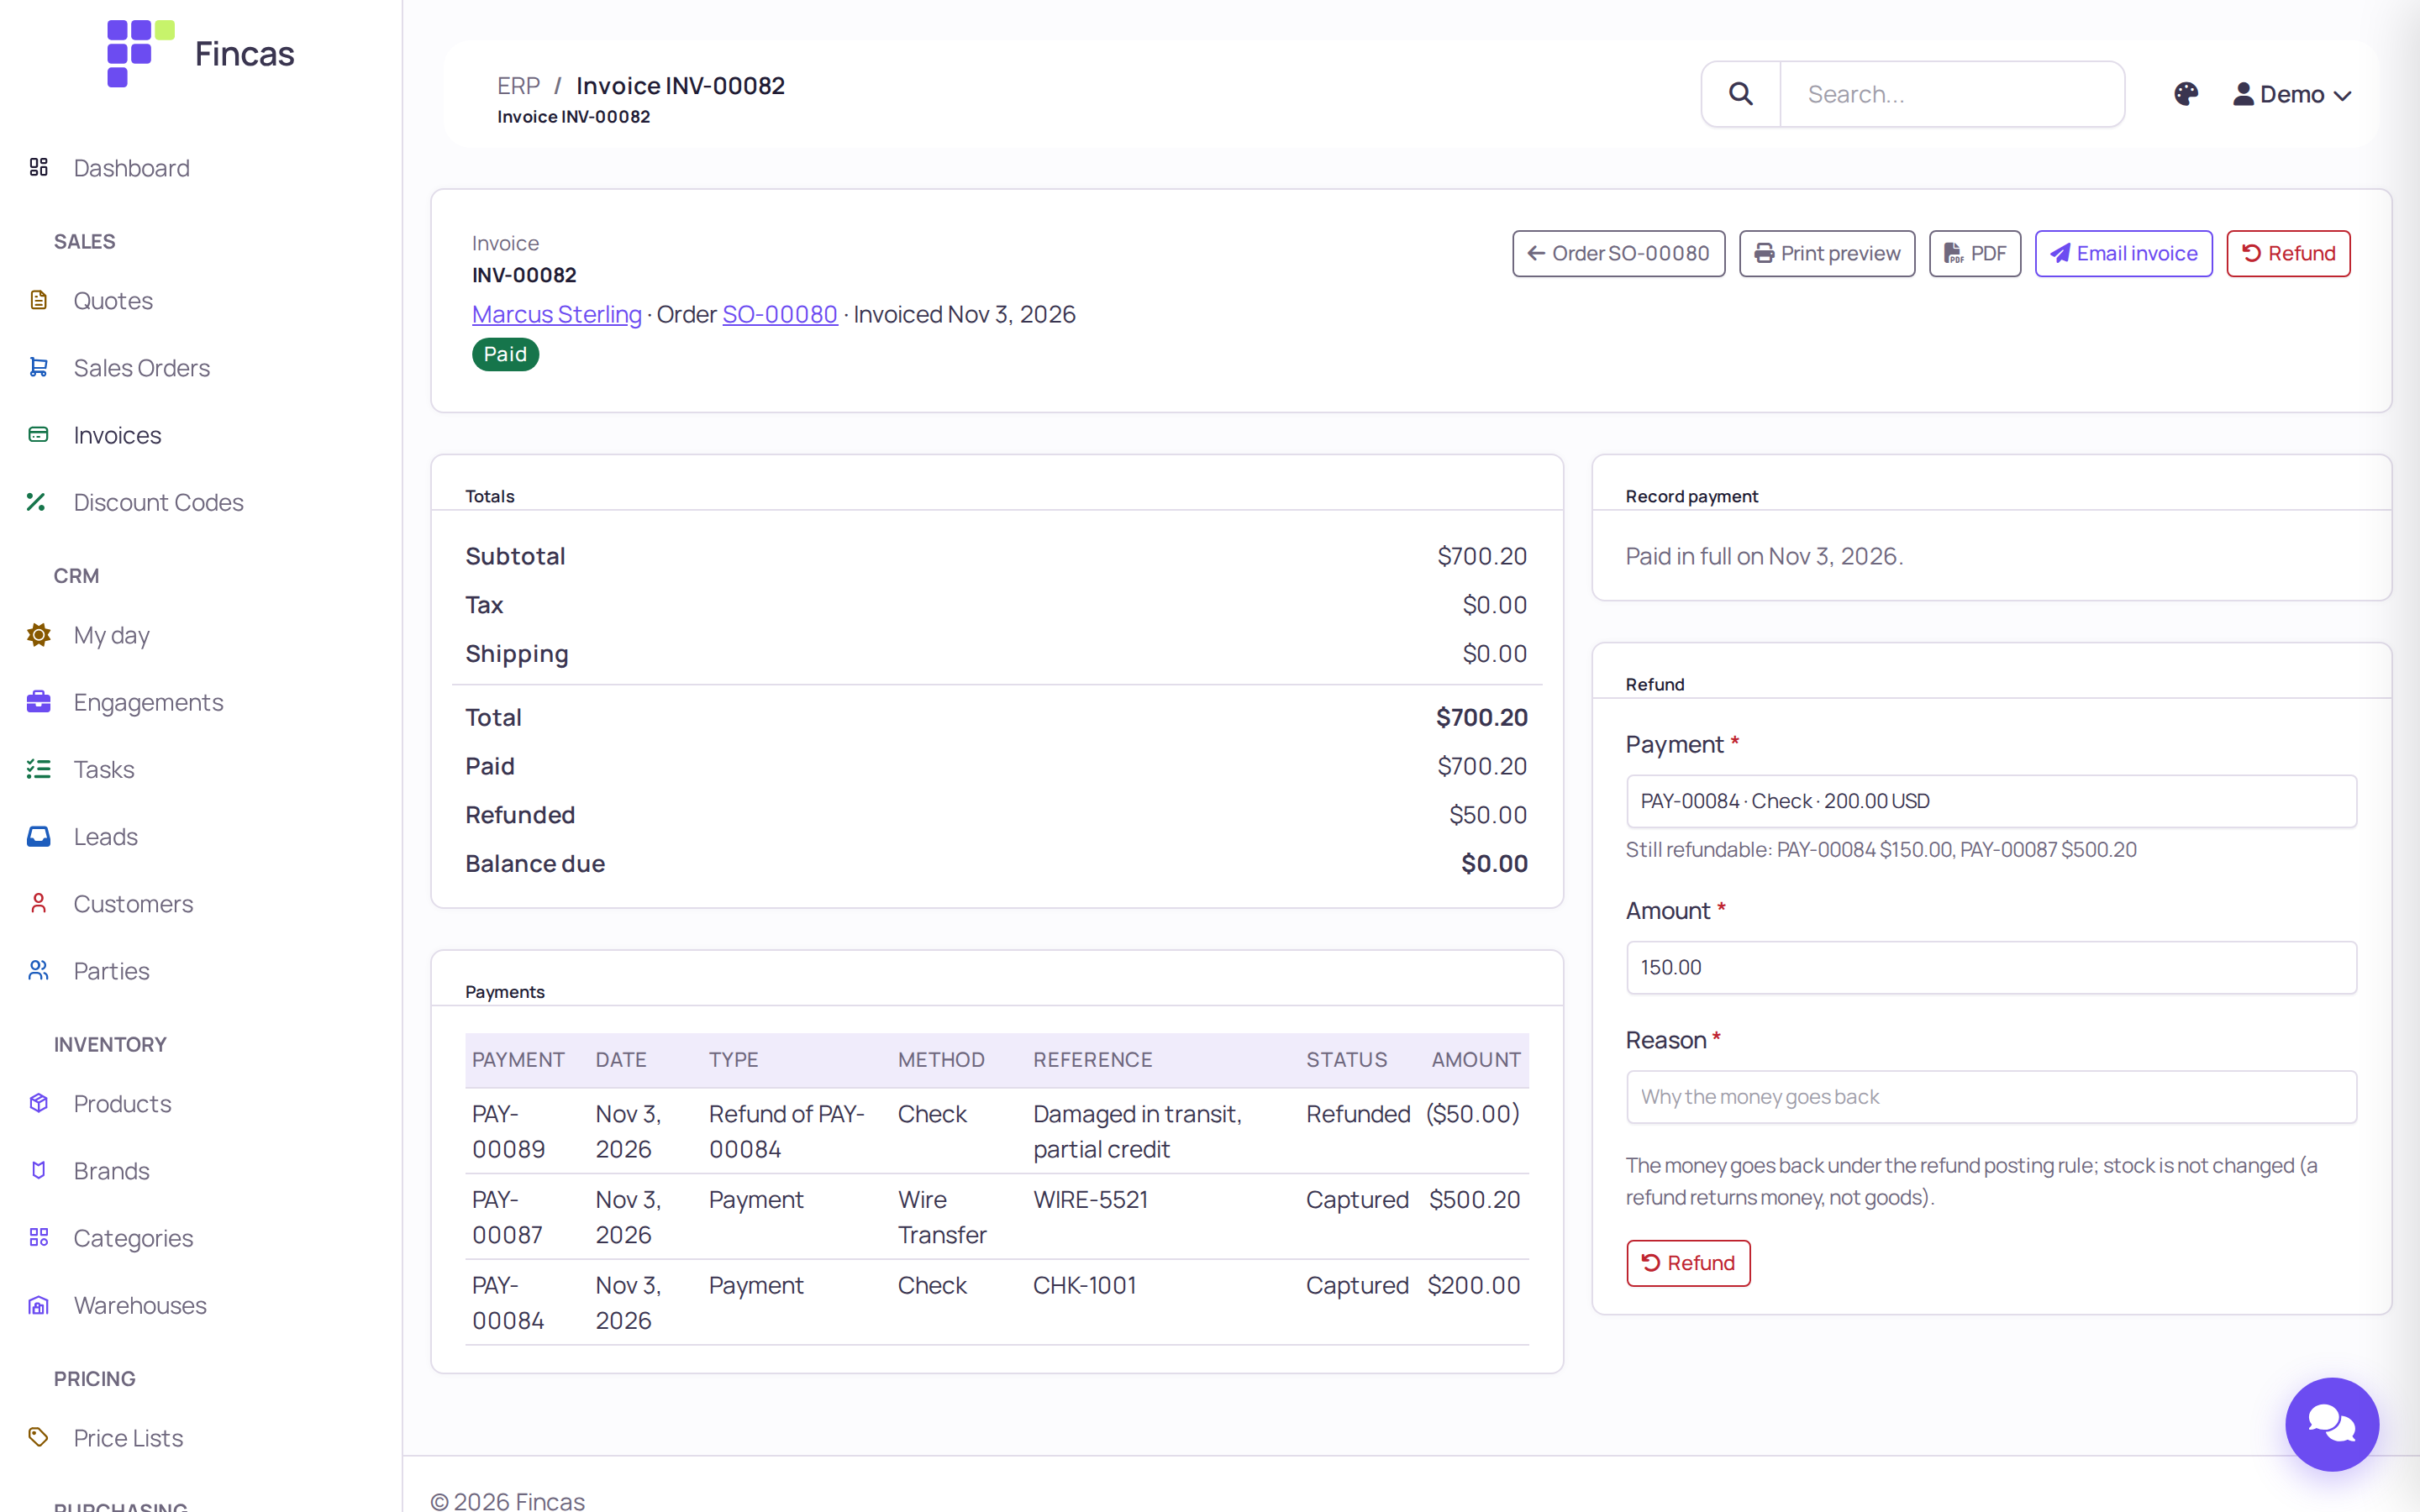
Section titled “Refund a payment”- Open the invoice and go to the Refund box (the Refund button jumps there).
- Pick the Payment to refund. “Still refundable” lists what is left on each payment.
- Enter the Amount and a Reason, click Refund and confirm.
The refund appears in Payments as “Refund of PAY-…” with the amount in parentheses, and the totals gain a Refunded line. Paid still shows what was received; the invoice keeps its status. Once refunds reach what was paid, the order’s payment status becomes Refunded.
What the customer sees
Section titled “What the customer sees”- Email Quote sends the quote PDF; Email invoice sends the invoice PDF. The order confirmation goes out on the first move to Awaiting Fulfillment or with Resend SO.
- A customer with a storefront login sees their orders, with status, payment and fulfillment, under the account pages of the storefront. See Storefront.
- Quotes and invoices are available to a signed-in customer through the customer portal API
(
/api/v1/portal/customer/quotes/and/invoices/); the bundled storefront doesn’t show them yet. See API and integrations.
Check your work
Section titled “Check your work”- Sales → Quotes shows the original quote as Superseded, the revision as Accepted, and the Deal column as Won.
- Sales → Sales Orders shows the order with its status and payment status.
- Sales → Invoices shows the invoice with Total, Paid, Balance 0.00 and status Paid.
- On the invoice, the Payments table lists each payment and refund with its reference.
If something goes wrong
Section titled “If something goes wrong”“Not saved — add at least one line item before saving this quote.” A quote or order needs a line. Pick a variant in Item code, or type an item name, quantity and rate.
The rate is the retail price even though the customer has a price list or tier. The editor always fills Rate from the variant’s retail price. Price lists and the customer’s pricing tier are not applied automatically. Type the agreed rate, or use Disc %.
The tax total goes back to 0.00 when you save. Choosing a Tax rate doesn’t calculate tax, and on save the totals are recalculated from the lines, which carry no tax when entered in the back office. In the current release a tax amount typed into Tax total does not stick.
“Please save the order first to create a PO / a pick ticket.” A new shipment group has no record until you save. Click Save & Continue, then use the button.
Create PO is grayed out. The group has no vendor. Pick one in Search vendor….
“Not recorded: the company has no posting rule for payments…” (or “Not refunded … no posting rule for refunds”). An accountant needs to set up the posting rule. Nothing was stored.
“Not recorded: … closed …” The payment date falls in a closed fiscal period. Use a date in an open period, or ask accounting.
“More than the balance due.” The amount is higher than what is left on the invoice, often because someone recorded a payment since you opened the page. Reload it.
“That action is turned off in the public demo.” Email and a few other actions are disabled on demo.fincas.dev. They work on your own deployment.